When and how to repot a plant
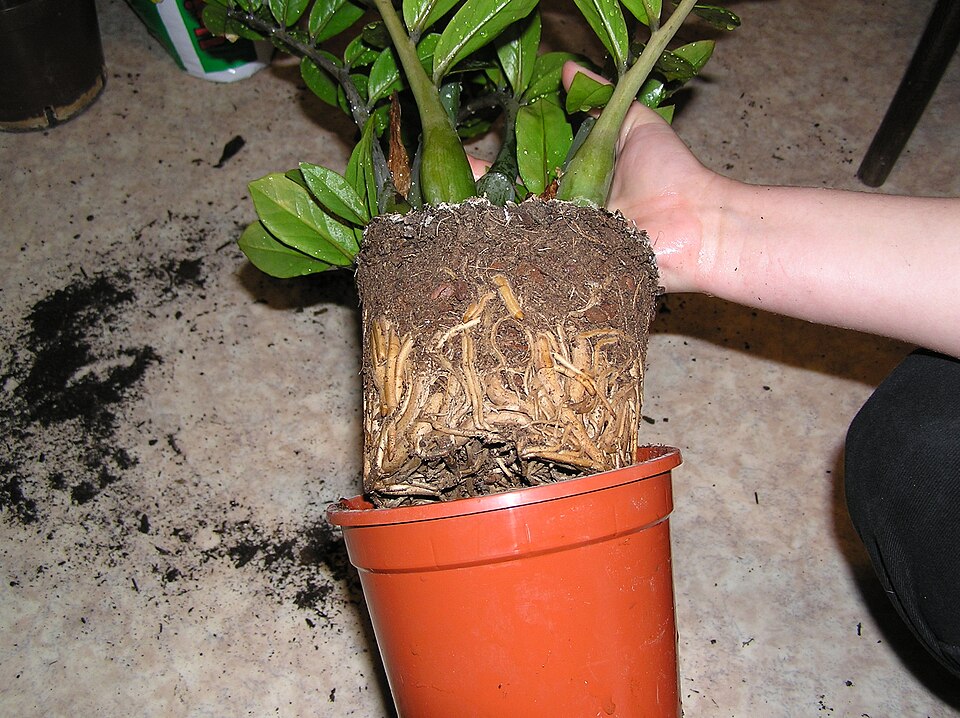
Repotting looks like a big deal, and many people put it off until a plant is clearly in trouble. It does not have to be a drama. A plant that has outgrown its pot, or whose soil has worn out, is easy to help if you do it at the right time and in the right way.
It is also a job where more is not better. A plant does not need a fresh pot every year, and a pot that is too big does more harm than one that is a bit snug. Here is how to tell, how to choose, and how to do it.
Signs it is time
No single sign decides it. Look for a few together.
- Roots coming out of the drainage holes or growing up over the top of the soil.
- A tight, tangled root ball. Slide the plant out of the pot, and if you see more roots than soil, with roots circling the outside, it is rootbound.
- Water runs straight through. The pot drains in seconds because there is little soil left to hold it, or the soil has shrunk away from the sides.
- The plant dries out very fast and needs water far more often than it used to.
- Growth has stalled during the growing season even though light and water are fine.
- The pot is top-heavy or keeps tipping, or it has cracked or bulged. Some plants, like snake plants, can split a plastic pot.
- The soil is old. It has turned compacted and hard, or has a white crust of salts on top, or no longer takes water well.
What is not a sign: that it has been a year. Some plants are happy for several years in the same pot, and a few flower better when slightly snug. Look at the plant, not the calendar.
When to do it
The best time is spring to early summer, when the plant is starting to grow and recovers quickly. Many plants will also cope with repotting in early autumn.
Do it at any time of year if there is an emergency: root rot, a pest living in the soil, a broken pot, or a plant that cannot hold water at all. A repot in winter is stressful, but a rotting plant in wet soil is worse.
Choose the next pot
Go up one size, no more. That means a pot roughly 2 to 5 cm (1 to 2 inches) wider across than the current one: closer to 2 cm for small pots and up to 5 cm for big ones. A much larger pot holds a lot of wet soil that the roots cannot reach. That soil stays damp for a long time, and damp, airless soil is what rots roots.
Drainage holes matter more than looks. A pot with a hole lets the extra water out. If you love a decorative pot with no hole, keep the plant in a plain plastic nursery pot with holes and slip that inside the pretty one. Lift it out to water and let it drain before it goes back, so water never collects at the bottom.
Material. Terracotta is porous and dries faster, which suits plants that hate wet feet, such as succulents. Plastic and glazed pots hold moisture longer, which suits plants that like to stay damp. Neither is wrong. Just water the plant to match its pot.
One thing not to do: do not put a layer of gravel or broken pot at the bottom to "improve drainage". Water collects above the layer instead, and the roots sit in it. Good soil and a hole in the pot are what drain well.
Pick the soil
Fresh, fitting soil is half the benefit of repotting. Plain potting mix is a good base for most plants, but it often needs something extra to let air in. Here are common starting points. They are a guide, not a rule, so adjust to your plant and your home.
| Plant type | A common mix |
|---|---|
| Most leafy foliage plants | Potting mix, with a handful of perlite or bark added for air |
| Monstera, pothos, philodendron and other climbers | A chunky mix: potting mix with extra bark and perlite |
| Succulents and cacti | A fast-draining, gritty mix: potting mix with plenty of perlite, pumice or coarse sand |
| Ferns and moisture-loving plants | A mix that holds water well, such as potting mix with some coco coir |
| African violets | A light, airy mix made for them |
| Orchids | Orchid bark mix, not regular soil |
If you are unsure, look up the plant's name and note what it grows in at home. A plant from a rainforest floor and a plant from a desert want very different things.
How to repot, step by step
- Water the plant a day or two before. A slightly damp root ball slides out more easily and the roots are less stressed than when bone dry.
- Get ready. Have the new pot, fresh mix, and clean scissors at hand. Put newspaper or a tray down.
- Add a little mix to the new pot. Enough that the plant will sit at the same height as before, with the top of the root ball about 2 cm (an inch) below the rim. That gap leaves space for water.
- Take the plant out. Tip the pot sideways, hold the base of the stem, and ease it out. Squeezing a plastic pot or running a knife around the inside edge helps. Do not yank it by the leaves.
- Look at the roots. Gently loosen the outer ones with your fingers. If they are circling, tease them apart so they can grow outward. Snip off any that are black, mushy or dead.
- Set it in the new pot, centered and upright, at the same depth as before. Burying the stem deeper can cause stem rot in many plants.
- Fill around the sides with fresh mix, tapping the pot on the table to settle it. Press lightly. Do not pack the soil hard, because roots need air.
- Water thoroughly until it drains from the bottom, then empty the saucer.
Aftercare
- Keep the plant in bright, indirect light for a week or two, away from harsh sun and cold drafts.
- Wait for the top of the soil to dry before watering again. New soil holds water differently, so check with your finger rather than a schedule. The watering guide explains how.
- Hold off on fertilizer for a month or two, since fresh mix already contains some nutrients. When you do start, the fertilizing guide shows how to keep it gentle.
- Do not move the plant around. Let it settle.
Why a repotted plant may sulk
It is common for a plant to look worse for a few weeks after repotting. It may droop, drop a few leaves or stop growing for a while. This is sometimes called transplant shock: the roots were disturbed and need time to re-establish in the new soil. It is usually temporary.
The mistakes that turn a sulk into a real problem are watering too much because the plant looks sad, and moving it from window to window. Give it steady light, water only when the soil says so, and wait. New growth is your sign that it has settled in.
If the plant looks worse after a month, look at the roots and the soil. A pot that is too big or a mix that stays wet are the usual causes.
Keep a note
Write down the date, the pot size and what you put in the mix. A year from now, when the plant looks tired, you will be glad to know when it was last repotted and with what.